How to Create Citations in Any Word Processor
Citing on site...
![]() One of the most intimidating for any new or returning student is adding proper citation to their work. With multiple styles and every style being its own standard, it’s easy to see why students are intimidated and confused when it comes to adding citations and bibliographies to their work.
One of the most intimidating for any new or returning student is adding proper citation to their work. With multiple styles and every style being its own standard, it’s easy to see why students are intimidated and confused when it comes to adding citations and bibliographies to their work.
Fortunately though, technology now takes most of the leg work out of citing your work. Whether you are a student or researcher, you should not have to sit there with a style guide trying to figure out how to add a citation for book, journal article or website.
As such, it’s worth taking a moment to understand how the citation system in your word processor works and how to best take advantage of it. Not only can it save you a lot of time with your writing, but it can help make sure that your citations are accurate and complete.
So here’s a look at how to add citations to your work, regardless of the word processor you use.
Add Citations and Bibliography in Microsoft Word
Microsoft Word easily has the most robust citation and bibliography tool. While it’s certainly the most flexible and powerful tool, it can also be a bit intimidating, especially for those who are new to it.
Here are the basic steps to follow:
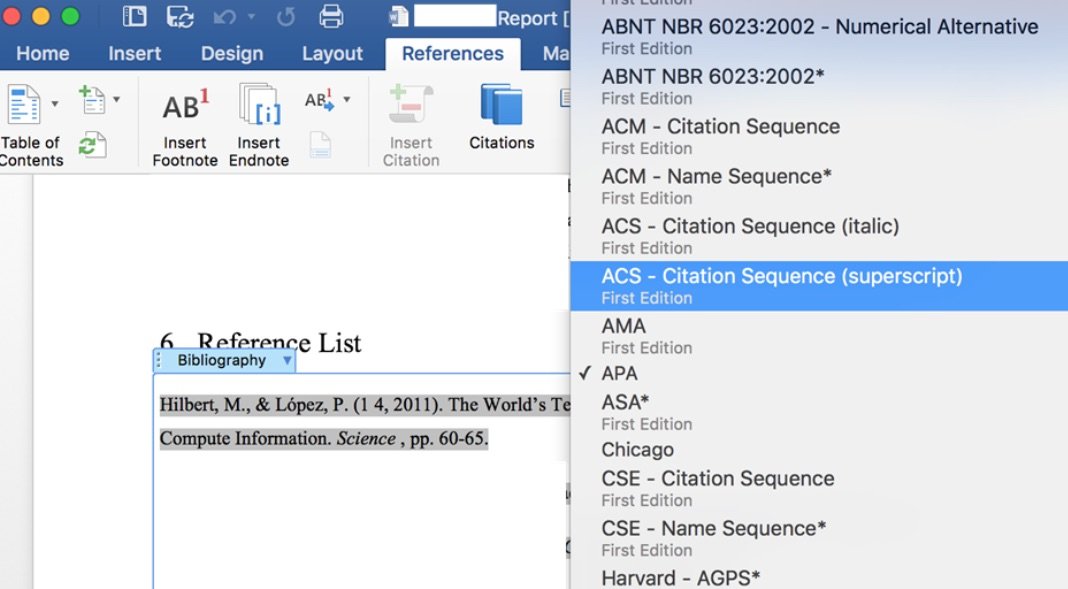
- Open the “References” tab in the menu.
- Under the “Citations & Bibliography” group, select the citation style you want to use.
- Put your cursor where you want to add a citation in your text (usually at the end of a quote or a fact you wish to cite).
- Click “Insert Citation”
- Choose “Add New Source” (Note: You can choose to add a placeholder, but remember about writing in a cleanroom before doing so.)
- Choose the type of source that it is and then fill out all available information on it.
- Once you click “Ok” the citation should be added.
- Once you’ve added a source, to add another citation to it, you simply select it from the dropdown when you click the “Insert Citation” button.
- When you’re done adding adding all of your citations and sources, you can then add a bibliography simply by clicking the “Bibliography” button in the group and selecting the type you want.
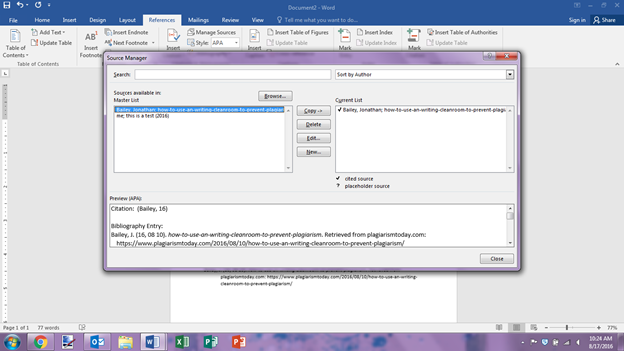
Another great feature in the group is the source manager, which is accessed by clicking “Manage Sources”. With it, you can edit, add, and manipulate your sources. The source manager also allows you to see which sources you have cited in your paper, marking them with a check, making it easy to delete and remove ones you don’t need.
All in all, the process is simple and Word can take most of the work out of adding citations to your papers. All you need to do is have your sources at the ready and be able to answer a few basic questions about them.
Add Citations and Bibliography in OpenOffice and LibreOffice

OpenOffice ,as well as its LibreOffice fork, are well-known free, open source alternatives to Microsoft Office. Though, for the most part, they’ve built a comprehensive and powerful word processor that’s a decent replacement for Microsoft Word, they are unfortunately lacking when it comes to adding citations.
The process, at least in native OpenOffice and LibreOffice, is highly convoluted and doesn’t provide out-of-the-box support for the most common citation styles.
This, unfortunately, makes these suites a poor choice for academic papers but, if you have to use it for one reason or another, here are the steps to take in OpenOffice:
- In the menus, select Tools > Bibliography Database to bring up the Bibliography Database
- Select an empty row and give the document a useful shortname. This is very important for later.
- Then, fill in the rest of the information available.
- Now, to add the citation, go back to your document, place the cursor where you want it and, in the menu, select Insert > Indexes and Tables > Bibliography Entry
- Select the short name from the list and hit “Insert”
- This drops the short name in brackets.
- When you’re done adding citations, in the menu, select Insert > Indexes and Tables > Indexes and Tables
- In the popup, change the type to Bibliography
- Select the “Entries” heading and edit both the structure of the entry and the sort order
- Hit “Ok” to create the bibliography
(Note: The steps are largely the same in LibreOffice though some of the menu names are changed.)
Unfortunately, you can not simply tell either OpenOffice or LibreOffice to simply follow, MLA, APA or Chicago styles. Zotero does offer a plugin for both OpenOffice and LibreOffice that may work for you, but I was unable to test it due to system requirements.
But while the OpenOffice process for adding citations is thorny, it’s still better than managing citations yourself. Still, it’s a good thing there is another free alternative available.
Add Citations and Bibliography in Google Docs
Google Docs is a free, online word processor that runs within the browser. While it may lack many of the features of Microsoft Word, it’s still perfectly adequate for most writing projects, including most research papers.
To make matters even better, it provides what is the easiest way to add citations and footnotes to a document.
To use it, simply do the following:
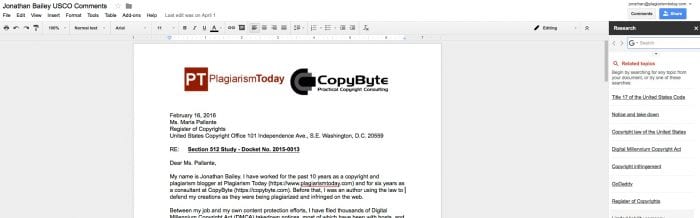
- Click on “Tools” in the menu and then “Research” to open up the research sidebar.
- Click the down arrow below the search bar to choose your citation format.
- Click the Google icon in the search bar to locate the type of content you are wanting to add.
- Search for the content you want to cite, using Google Scholar to search for journal articles and “Everything” for almost everything else.
- Place your cursor where you want to add the citation in the document.
- Hover over the item you want to cite in the sidebark and click “Cite”
- Google Docs will automatically add an in text citation and a footnote.
While Google Docs’ approach is simple it’s not incredibly robust. It works best when wanting to do numbered citations in text and footnotes. It also doesn’t work well with books as there is no ISBN lookup.
For a more robust citation tool, EasyBib has a similar but more powerful tool that can be added to your Google Docs for free. Once installed, it’s activated under “Add-ons” and lets users search for books, journal articles and web pages by a variety of means. It also enables the creation of a full bibliography.
However, unlike Google Docs’ native interface, there’s no easy way to add in text citations or footnotes. If this is something you need, you can use EasyBib.com directly and add your own citation numbers.
Apple Pages
Unfortunately, Apple’s word processor, Pages, does not provide an easy way to add citations. While there is a plugin for Reuters’ EndNote product that provides this functionality, it requires a copy of EndNote to operate.
Frustratingly, a downloaded copy of EndNote will cost $249.95.
The only free way to add citations to Pages appears to be to manually enter and manage them yourself. However, you can use some of the services below to manage your citations if you either need or strongly prefer to use Pages.
Other Alternatives
![]() In addition to the above sites and tools, there are other alternatives that may help you assemble your citations.
In addition to the above sites and tools, there are other alternatives that may help you assemble your citations.
These can be especially useful if you either can’t or don’t want to use any of the word processors listed above. Simply put, these products are word processor agnostic and can work in almost any environment.
- EasyBib.com, Bibme.com & Citation Machine: We discussed EasyBib above in conjunction with Google Drive but it’s also a standalone site. It, Bibme and Citation Machine are run by the same company and provide largely the same service, making it easy to search for and add items to your bibliography.
- RefMe: Though similar to EasyBib and its kin, RefMe is owned by a different company and may work better for some users. Though RefMe says it’s an APA citation generator, it also works with MLA, Chicago and more.
- Zotero: Zotero is free software that collects, organizes and aids in the citation of research material. It also has collaboration features and other tools. While it might be overkill for students just wanting to write a paper, for those with more advanced research needs it could prove useful.
- Qiqqa: Similar to Zotero, Qiqqa is an app that allows users to store, organize and search their research information. It also offers InCite, which allows easy creation of citations and bibliography.
- Docear: Finally, one more software tool that mostly focuses on organization of research data but also streamlines citation as well. This one is free and open source.
Depending upon your writing style or the scope of the project you’re working on, one of these solutions may better fit your needs. However, if they don’t, there are plenty of others out there and there’s little reason to not give some of them a try.
Bottom Line
In the end, Microsoft Word has the best means for adding citations to a work. It’s the best combination of completeness and simplicity. However, Google Docs (with or without EasyBib) is definitely more simple and enables you to easily search for what you want to cite and import the data.
But, regardless of platform, the days of being confused and worrying about citation standards is largely over. These tools make it easy to organize and compile your bibliography and ensure that your work is properly cited.
So, if you aren’t using one or more of these tools, get started immediately. You’re not just making your work more difficult, but increasing the likelihood of making a mistake.
Want to Reuse or Republish this Content?
If you want to feature this article in your site, classroom or elsewhere, just let us know! We usually grant permission within 24 hours.