Adding Copyright to Exif Automatically

Whether you’re a professional photographer, an amateur artist or just someone who likes to post images on the Web from time to time, you probably want to make sure that others know who the image belongs to, even if you don’t mind it being copied.
The problem is that, as images are passed around, they usually get separated from identifying information. For example, once an image leaves your Flickr Account, there is nothing to identify it as yours, unless you watermark it before uploading.
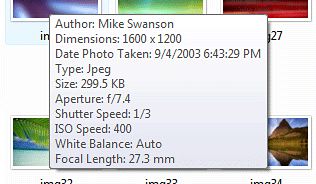
However, JPEG images have long had a means of embedding invisible data into an image. This data, known as Exif, can carry an abundance of information about the image including the camera type, its settings and information about the copyright holder.
Last year, I discussed Microsoft Photo Info, a powerful and free tool for adding Exif data to images. The problem with that system is that it is still time-consuming, even with batch editing, and it is easy to forget to add the metadata before uploading.
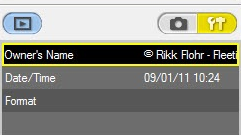
But photographer Rikk Flohr has proposed a better solution. By making some changes to your camera, you can embed your copyright information into your photograph at the second the image is taken, no need to do anything on your computer.
It’s a simple idea, but one that will save many photographers a great deal of time and headache.
How it Works
The truth is that your camera, whether it is an expensive high-end SLR or a cheap “toy” camera, already adds a great deal of Exif data to every image it takes.

If you look at the Exif data of an unmodified image, you’ll see that the camera adds information about the camera, its settings, the date (if possible) and more. However, since the camera doesn’t known anything about its owner, it can’t add that information.
Fortunately though, as Flohr pointed out in his article, most cameras come with software and drivers to help you set up the camera. Most of those applications have the ability to to add author, copyright and other information.
That way, when the camera writes its regular Exif data to the image, it also writes the photographer information in, ensuring that it is added before the image leaves the camera. This leaves no room for human error and eliminates a step before putting the photo on the Web.
Needless to say, if you’re a photographer that enjoys putting photos on the Web, this is a step you should take immediately.
How to Do It
Unfortunately though, there is no consistent way to set this feature in all cameras as every manufacturer and every camera is slightly different.
If you have your CD that came with your camera, install the software from it and hook up your camera. From there, you should be able to edit the author information and add other details. If you don’t have the CD anymore, you can likely download the drivers from your camera manufacturer’s site.
According to Flohr, most cameras have this ability, including most inexpensive ones, but some likely will not. In those cases you will have to resort to using software-based solutions such as Microsoft Photo Info.
However, according to the comments to the blog post, Adobe Lightroom has the ability to automatically add the information upon import, making it a good choice as the process doesn’t require any human intervention.
All in all, it should only take a few minutes to set up but could easily save hours spent manually adding Exif data to images after the fact.
Caveats
As I mentioned in my previous discussions of Exif data, there are a lot of potential problems.
First, it doesn’t actually prevent or discourage copying, rather, it just helps identify the image as yours after it is distributed (you can always supplement Exif data with a visual watermark). Second, the data can be easily erased without destroying the image. Finally, you can’t use it on PNG or GIF format, only JPG.
However this particular method also comes with its own unique set of problems. For one, it only works well if one person is using the camera. If two people share a camera, they would either have to share the copyright notice or manually change it after importing it.
Second, some applications overwrite or modify this information, often times by accident. Also, uploading your images to Flickr or Facebook will result in the data being stripped out in most cases.
If you use this method for adding your name to your images, you need to be very careful of the people you allow to use your camera, the software you use to edit your images and the places you upload it to. Failure to do so can actually make things worse, not better.
Bottom Line
All things said, this by far the easiest and most reliable way to embed your name and information into your photographs. It only takes a few minutes to set up and can help protect your works when they get copied, prevent them from becoming orphan works (should the law come to pass) and generally make your images more secure.
Anyone who is serious about their images and posts them online should take this step as soon as possible if their camera will allow them.
Like most good ideas, it’s beautifully simple. It is fast, easy, free and comes with no drawbacks to the viewer. Even if one isn’t very interested in protecting their images, there’s no reason to not take this step.
Want to Reuse or Republish this Content?
If you want to feature this article in your site, classroom or elsewhere, just let us know! We usually grant permission within 24 hours.
